Boot Sequence in Android
AndroidHaving good knowledge about the boot sequence will be useful when troubleshooting a bricked Android device, flashing a custom ROM, or rooting. There are many device-specific forums that did amazing write-ups on those topics, so I will not be talking about it, but I will go through some of the basics on boot sequences in Android, different boot modes in Android, and how rooting works on an unlocked bootloader phone. While researching this topic, I stumbled upon a few interesting write-ups on rooting techniques for locked bootloader devices; maybe I will talk about that in the near future. :)
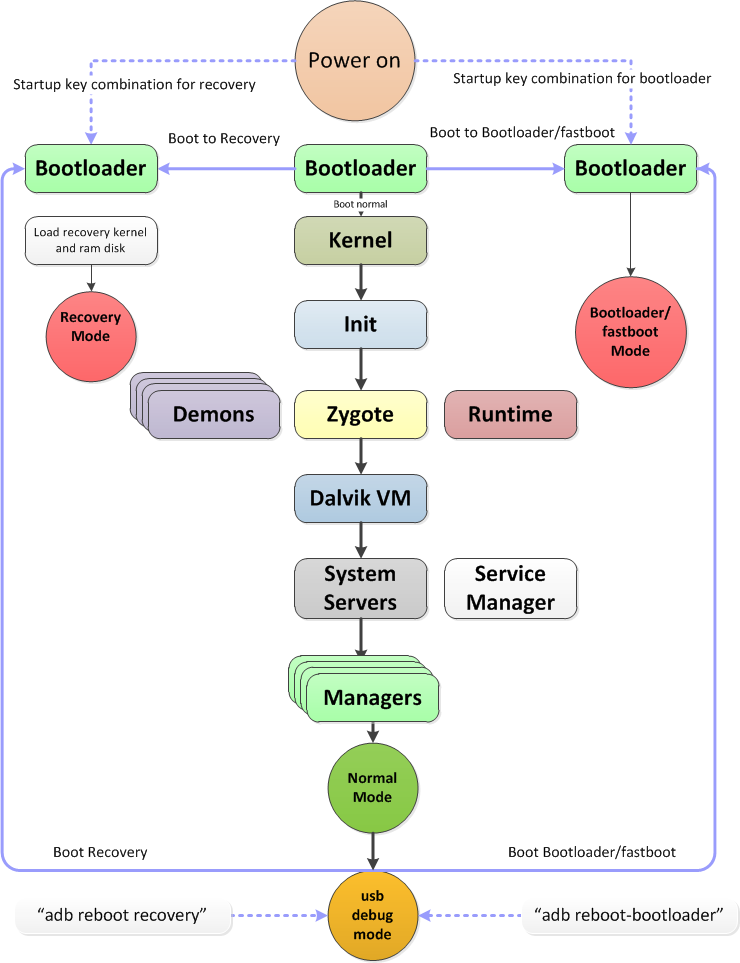
Boot Sequence in android
- Boot loader - Stores the phone’s boot loader program that initializes the hardware and boots the Android kernel. It is usually the manufacturer’s proprietary code.
- Once the boot loader has finished initializing the hardware, it loads the Android kernel and initrd from the boot partition to RAM, then jumps into the Android kernel.
- Android kernel will run all the tasks needed for the Android system to run.
- Once all important tasks run successfully, the root file system will be mounted and the first user-space process init will start.
- The init is the initial process for all other user-space processes. The init.rc specifies the actions to take while initializing the OS user space components, such as starting services like Android Debug Bridge daemon (adbd), rild for telephony, and so on.
- Zygote will start Dalvik VM and start the first Java component System server.
- Other Android Framework Services Manager such as Telephony Manager will be started.
Download mode
Download mode allows users to update the persistent storage at a low level through a process typically called flashing. It is normally available via the fastboot protocol.
Recovery mode
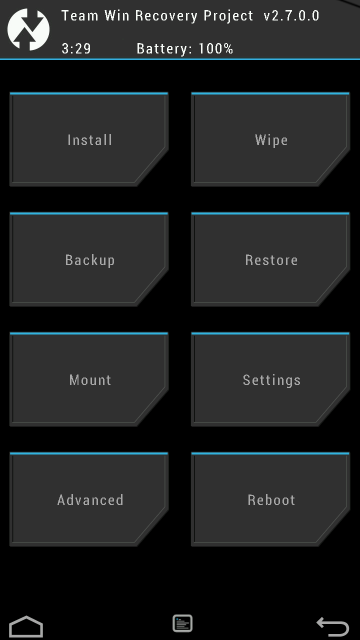
Stores a minimal Android boot image that provides maintenance functions and serves as a failsafe. Many power users prefer to flash a custom recovery on their device such as ClockworkMod, TWRP, etc. A custom recovery will provide the same functionality as the default recovery mode but with additional functions such as backing up and recovering the device, installing custom ROMs, and many more. The figure below shows a sample screenshot from TWRP.
PS: If you have the need to provision multiple device with the same setup, you can back up your device with tools like twrp and recover it on other devices.
Locked and unlocked boot loaders
Locked boot loaders prevent end users from performing modifications to the device firmware by implementing restrictions at the boot loader level. They usually have cryptographic signature verification that prevents booting or flashing unsigned code to the device. Unlocking a boot loader carries serious security implications. If the device is lost or stolen, all data on it can be recovered by an attacker by uploading a custom Android boot image or flashing a custom recovery image, granting them full access to the device’s partitions.
How to lock your unlocked Android devices
#boot into fastboot
adb reboot recovery
#check boot loader lock status
fastboot oem device-info
#lock boot loader
fastboot oem lock
Recovery Images
The Android recovery system is Android’s standard mechanism that allows software updates to replace the entirety of the system software preinstalled on the device without wiping user data.
Rooting with an Unlocked Boot loader
You can modify a factory image to add an su binary. In this example, we unpack an ext4 formatted system image, mount it, add an su binary, and repack it. If we flash this image, it will contain the su binary and the device will be rooted.
mkdir systemdir
simg2img system.img system.raw
mount -t ext4 -o loop system.raw systemdir
cp su systemdir/xbin/su
chown 0:0 systemdir/xbin/su
chmod 6755 systemdir/xbin/su
make_ext4fs -s -l 512M -a system custom-system.img systemdir
umount systemdir